SuperSight: a graphical enhancement mod for Brøderbund's Stunts
Clickbait disclaimer: Stunts was actually created by Distinctive Software; Brøderbund was only the publisher. But nobody heard about Distinctive, and I wanted to be sure this article does not get confused with the one about Disney's Stunt Island. Sorry about that.
Part I
This series will tell about the creation of SuperSight, a mod for Stunts intended to bring the game’s 3D engine into a new era (let’s say, 1992 instead of 1990). You can read the articles to learn some reverse engineering techniques and enjoy my rants, but feel free to jump instead to the download page and start playing the game immediately. Also, if you like it, consider joining the community – racing is more fun in company.
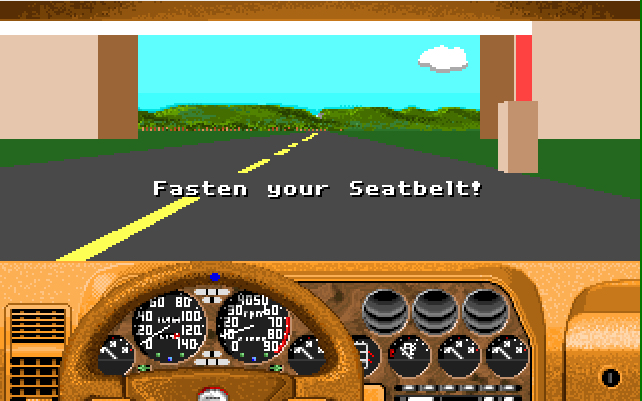
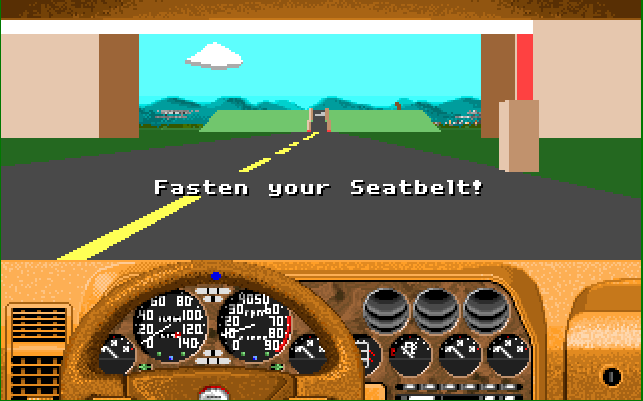
Here is how the game looks like, with and without the patch.
What is this game?
Stunts (also known as 4D Sports Racing) is a racing game where the player controls real-life cars on very non-real-life tracks, packed full of jumps, loops, elevated roads and difficult terrain. If you are thinking of Trackmania (or Hard Drivin’) you are on point: just add the charme of driving a Lamborghini or a Porsche instead of an anonymous vehicle. The most important difference, however, is a track editor that makes creating new circuits as easy as playing with Legos: it can really be picked up in a couple of minutes.
The fantastic editor is probably the reason why, even if it never attained cult status, Stunts still has a small but extremely active community. New content is continuously being created, as the track designers make use of 35 years of experience to enable incredible acrobatics, while other fans build new cars, aiming for maximum realism or for creative exploration of the possibilities offered by the game engine.
If you want to explore Stunts’ world, I have included useful liks in my resources section.
In this video you can see the game in the hands of a world-class expert.
Starting to hack
You may remember that last year I created a very similar mod for a very similarly titled game, Stunt Island. The analogies between the two games are many, which gave me hope to complete the task quickly by means of the same technique:
- attach a debugger to the game
- navigate to the options menu and change the graphics detail
- take note of where in the memory such variable is stored
- analyze the executable in a debugger and find where else in the code this memory location is being used
- one or more of such users must be code in the rendering algorithm
- alter the rendering code to increase the detail
Therefore, I thought the mod would take me a fraction of the time I needed for the previous project. This was an error. The first of a long series.
First thing, getting the executable. It comes in this format:

Well, there is no way that the game is contained in less than one KByte, so I must investigate further. Fortunately, during my preliminary research I found out that stunts.hu, the biggest fan community for the game, contains a trove of information about past reverse engineering attempts. The relevant bits must be pieced together by visiting the relevant subsections of Wiki and forum, but it’s a welcome alternative to the solitary effort that Stunt Island was. As a 2009 post explains in detail, Stunts uses a multi-stage loading where STUNTS.COM calls LOAD.EXE, and LOAD.EXE decompresses and pieces together various binaries (depending on the graphic card selected) to build up the real executable image in memory.
Luckily, I could ignore all these details because the community has already produced a much simpler GAME.EXE containing the final product. It can be grabbed from the Restunts repository, so I cloned that and proceeded to analyze the executable, blissfully ignoring what the rest of the repository had to offer. This is mistake #2.
I started GAME.EXE under Dosbox-Debug and navigated to the options menu.
There I found out that this game does not save its options in a file. This prevented me from setting a breakpoint on that event, as I did when hacking Stunt Island. And just like it happened at that time, no alternative technique (such as breaking on keyboard input) worked. I opened the executable in Ghidra to look up the strings in the menu, but they were not there.
I wasted an hour on this screen before deciding to have a look at what the rest of the Restunts package had to offer. Which was a lot. So much that, forget the options menu, this post will have to take a detour.
The Restunts project
In the first decade of the century, a group of Stunts fans tried to get the source code of the game, to better understand the algorithms and create mods. Kevin Pickell, one of the main programmers, sadly informed them that the code was lost. As a consolation prize, he also told them that the game was to be considered freeware and it could be distributed without problems. Undeterred, a handful of coders decided to reverse engineer the game from the machine code. Not only they producted the synthesized GAME.EXE, but they disassembled it and decomposed it in segments with the help of IDA Pro. After that, they started to label every assembly function and port it to a C equivalent. Although the momentum faded out and the initiative came to a halt in 2015, they made good progress on their analysis, leaving behind a wealth of information.
A more detailed history of the project can be found on the relative wikipage. But now, let’s see what the Restunts project encompasses:
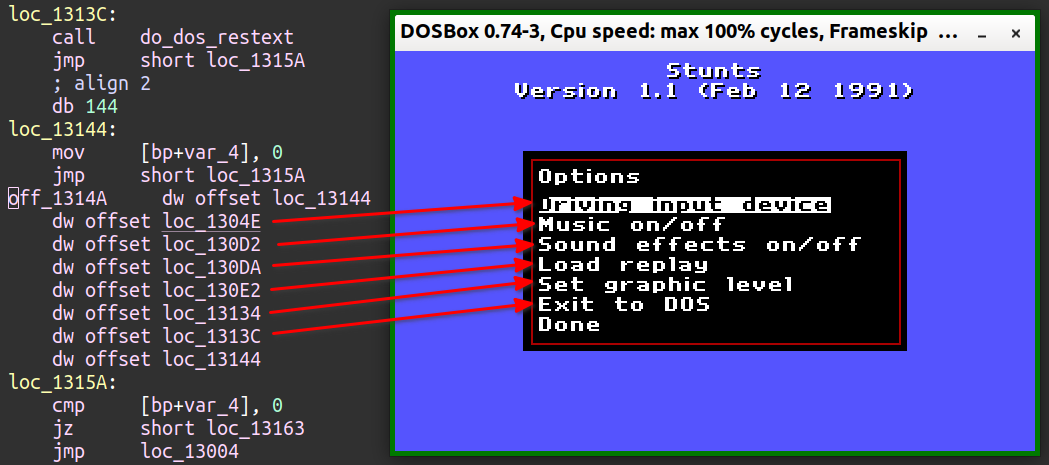
That’s a lot! The docs contain notes about the game, src includes support utilities and side projects (like a full reconstruction of the MT32 driver), stunts contains GAME.EXE and an already built copy of the project (which should be equivalent to GAME.EXE, just with the code written in C) and tools provides the toolchain used to build the source, a strange collection of Windows and DOS tools, plus a Windows-based makefile system that glues together all the components.
The centerpiece, however, is obviously src/restunts, providing the game in three directories:
asmorigcontains the unaltered disassembly ofGAME.EXEasmis a copy ofasmorigwhere the functions ported to C are inactivated and replaced with calls to the C codeccontains the code of the ported functions.
For the moment I did not need to build the project; just reading the source code, enriched with years of annotations from the people who worked at this reverse engineering project before me, was a huge help. I could have headed directly to the graphic engine, but I was set on the options menu, so I followed this thread of investigation.
The options menu, revisited
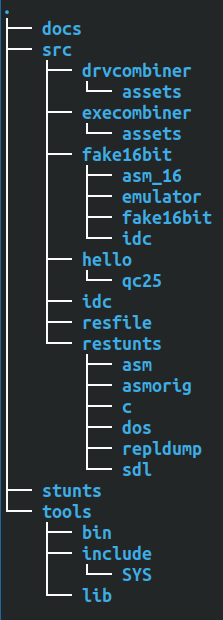
Searching for option in Restunts’ code led me to the ported stuntsmainimpl function, which was simple to understand.
Unfortunately, the function run_option_menu was not ported to C, so it was time to dive in the assembly code. With about 40 source files and no IDE to help me, grep was the workhorse. I found the function: it loads the menu text from a resource file, which explains why I could not find the text in the executable. After a longish analysis, I isolated this fragment:
    call    show_dialog
    add     sp, 12h
    mov     [bp+var_2], al
    cbw
    sub     ax, 0FFFFh
    cmp     ax, 7
    jbe     short loc_13046
    jmp     loc_1315A
loc_13046:
    add     ax, ax
    xchg    ax, bx
    jmp     cs:off_1314A[bx]
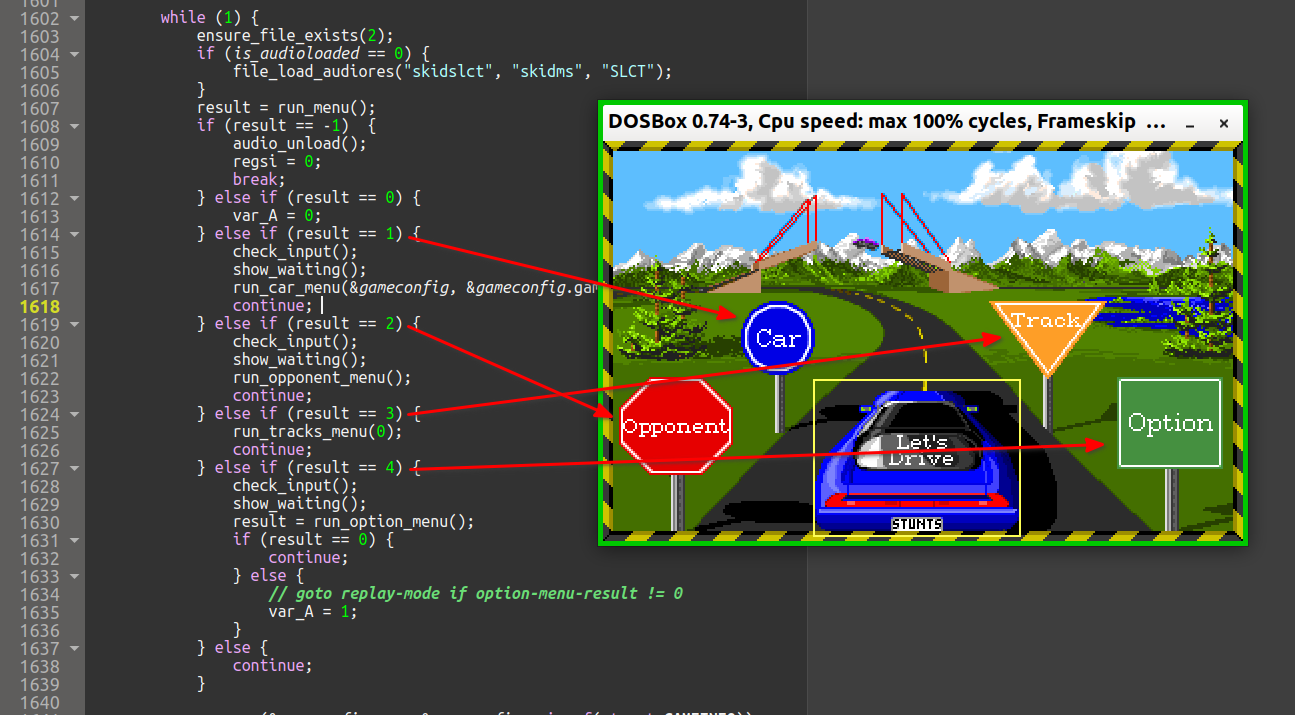
The function calls show_dialog, which (based on common sense and on what I saw in other points) returns in the register AL the ordinal number of the option chosen by the user. After some convolutions, the function uses the result for a computed jump in the table at off_1314A. I bet there was a switch statement in the original. I could not understand some quirks (why adding 1? Why doing it with a sub instruction?) but it’s not important.
If one selects “Set graphic level”, the instruction pointer lands on loc_13134, which is a call to do_mrl_textres. I renamed the function in something more meaningful for future adventurers.
The function do_mrl_textres has about 200 lines of code, but the core was easy to find since the repeated comparisons stick out:
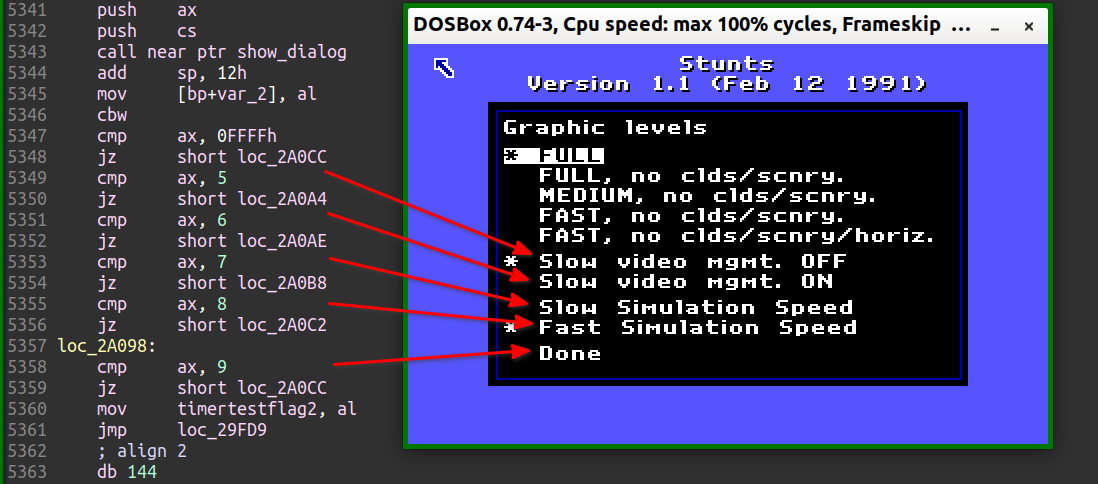
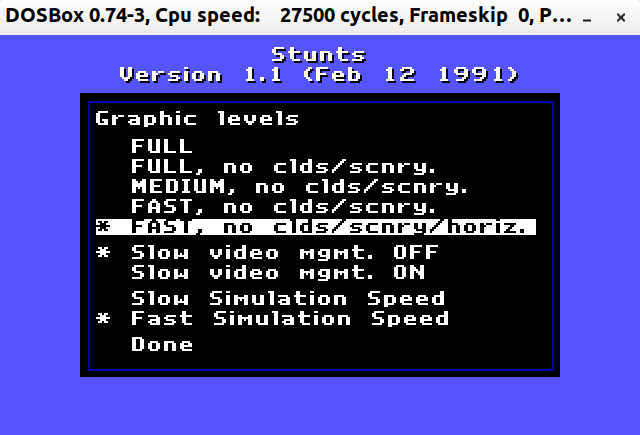
So, here my first discoveries: if one of the first 5 options is chosen, the result is stored in a program global, timertestflag2. I relabeled this variable as detail_level, taking note that the best value is 0, while the worst is 4. In addition I renamed the option affected by choices 6 and 7, timertestflag, into slow_video_mgmt.
To ensure my findings were correct, and to find out the memory addresses of the flags, I wanted to place a breakpoint on the graphic options menu with DOSBox debug, as I had set out to do at the start of the project. However, this is a side quest, so you can read about that in the appendix 1.
A tile-based graphics engine
I looked at where detail_level appears in the code, to find out where the rendering engine is using it. the hope was to somehow alter the instructions at that location to improve the graphic detail.
A variable search in the Restunts project led me to the function update_frame in frame.c. At this link you can find the original version of the function before my variable labeling, in case you want to unravel the mystery for yourself.
One of the first occurrencies of the detail level is at line 313. The variable is used as index in an array.
var_130 = byte_3C09C[detail_level];
A look into the data segment assembly shows the array content:
byte_3C09C     db 2
    db 2
    db 1
    db 0
    db 0
    db 0
So, var_130 is 2 if one of the first two graphical level options are chosen, 1 if the third is chosen and 0 otherwise. A comparison with the graphic options menu helps to make sense of the meaning: the value 2 corresponds the the “full” level, 1 to the “medium” and 0 to “fast”.
This seems a pretty important value. Remarkably, it is only used once, so the instruction consuming it must be a key point of the algorithm. Let’s examine the context, a big for cycle spanning lines 315–402:
	for (si = 0x16; si >= 0; si--) {
		if (var_50[si * 3 + 2] <= var_130) {
			var_pos2lookup = var_50[si * 3] + var_pos2adjust;
			var_poslookup = var_50[si * 3 + 1] + var_posadjust;

			// the body of the cycle follows
			// ...
		}
	}
The value of var_130 determines whether an iteration of the cycle is executed or not. There remains the problem of understanding what the loop is doing in the first place, but this is actually not a hard enigma for someone acquainted with the game. Remember when I spoke about Stunts’ intuitive track editor? Time to have a look at it:
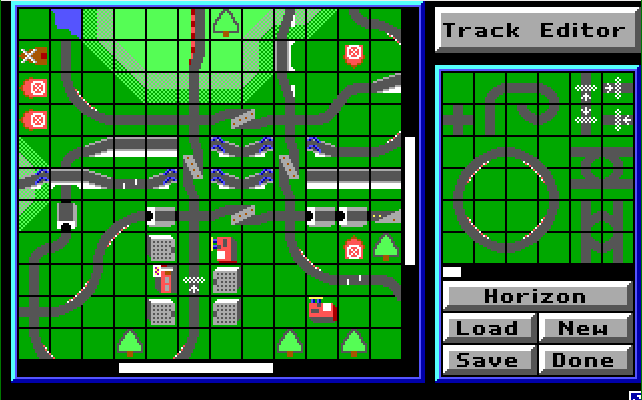
Stunts’ game world is made of big square tiles, each of which can contain at most one element (piece of track or scenario). It was natural for me to suppose that the above for cycle is looping on a list of possible tiles to draw and deciding which ones to effectively render. The number of iterations (23) is compatible with this hypothesis, as opposed to, say, a list of polygons – there would be too few of them.
The data about the tile are contained in the vector var_50, which is apparently an array of three-byte structures. The first two bytes are added to what I find out to be the East-South coordinates of tile where the camera is currently located. In other words, they are the offset of the tile to be rendered with respect to the player. The third byte instead is compared against the graphic detail: lower graphical levels will discard some of the candidate tiles.
Let’s see how var_50 is computed.
// shape3d.c line 2628:
unsigned select_cliprect_rotate(int angZ, int angX, int angY, struct RECTANGLE* cliprect, int unk) {
	// ...
	return polarAngle(vec2.x, vec2.z) & 0x3FF;
}

// frame.c line 257:
var_52 = select_cliprect_rotate(var_angZ, var_angX, var_angY, arg_cliprectptr, 0);
var_50 = off_3C084[(var_52 & 0x3FF) >> 7];

// dseg.asm line 3697:
off_3C084     dw offset unk_3BE9A
    dw offset unk_3BEE0
    dw offset unk_3BF26
    dw offset unk_3BF6C
    dw offset unk_3BFB2
    dw offset unk_3BFF8
    dw offset unk_3C03E
    dw offset unk_3BE54
The game stores in var_52 the heading of the car (result of select_cliprect_rotate), then it takes the most significant 3 bits (i.e. it rounds the heading to the nearest 45°) and uses the result to store in var_50 one of 8 possible data arrays. Let’s have a look at one of them. It’s hard to understand the meaning with naked eye…
unk_3BE9A     db 2
    db 252
    db 2
    db 1
    db 252
    db 2
    db 0
    db 252
    db 2
    db 255
    db 252
    db 2
    db 254
    db 252
    db 2
    db 2
    db 253
    db 1
    db 1
    ...
…but with the vim editor it takes only a minute to format the thing in a table, showing a very regular structure:
East      2   1   0  -1  -2   2   1   0  -1  -2   2   1   0  -1  -2   2   1   0  -1  -2   1  -1   0
South    -4  -4  -4  -4  -4  -3  -3  -3  -3  -3  -2  -2  -2  -2  -2  -1  -1  -1  -1  -1   0   0   0
Detail    2   2   2   2   2   1   1   1   1   1   1   0   0   0   1   0   0   0   0   0   0   0   0
I was very relieved to see that the data make sense! Stunts uses a painter’s algorithm to draw the graphics, so the tiles that are farther from the player appear first, and are associated to a higher detail threshold so they are only rendered if the player wants a high quality. Also, this table seems to correspond to a car facing north, so the South offset ranges from 0 to -4, while the East offset is symmetrical around the car (-2 to 2). The tables for the other heading angles are just rotations and mirror copies of this one.
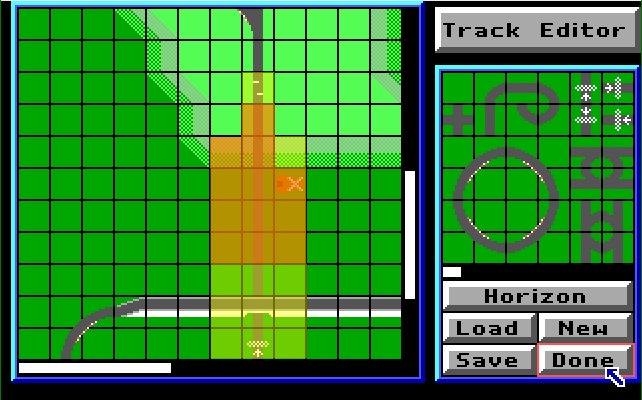
Let’s visualize what the algorithm does with the help of the Default track. On the left the tile view, with the position of the player represented by a star. I shade in yellow the visible tiles where the detail threshold is 0, in orange those where it’s not 0.

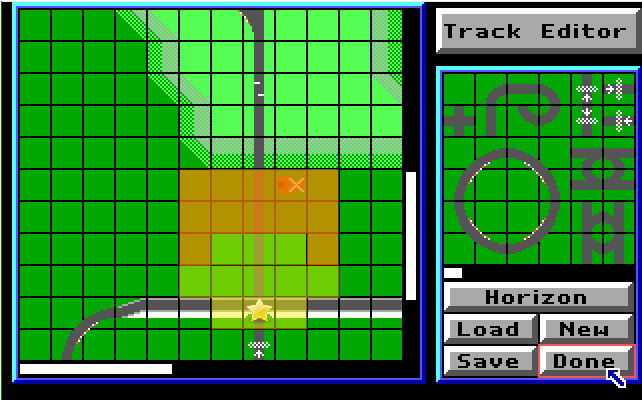
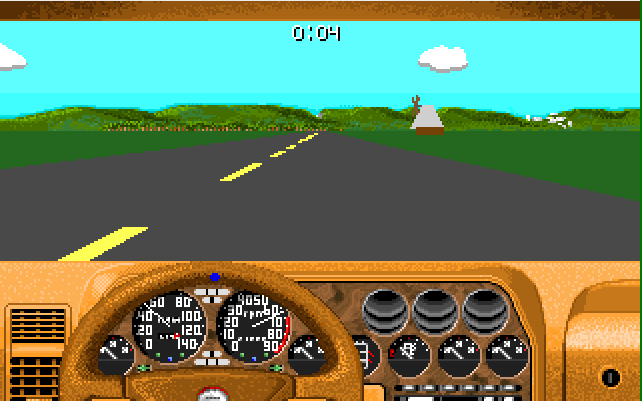
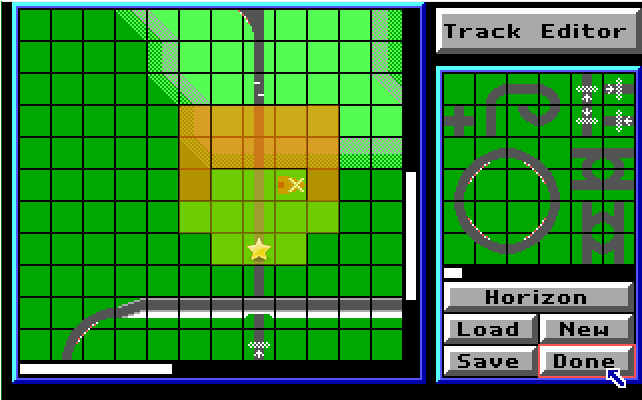
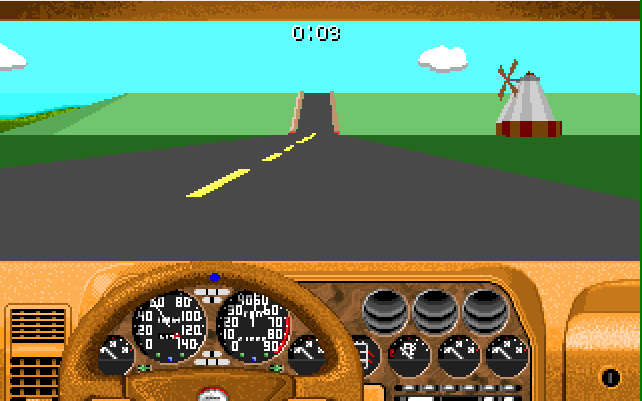
Notice that, as the windmill enters the yellow zone, it is rendered with more details (striped body, conical “hat”). This is taken care by a code portion that I have not shown yet, but whose meaning is easy to recognize:
// frame.c line 756. var_FC contains the detail threshold of the tile.
if (var_FC != 0) {
	currenttransshape[0].shapeptr = var_trkobject_ptr->ss_loShapePtr;
} else {
	currenttransshape[0].shapeptr = var_trkobject_ptr->ss_shapePtr;
}
Again, while the variable labeling is not perfect, the titanic work of Restunts’s authors makes it a lot easier and faster to find the relevant sections. The name ss_loShapePtr catches the eye even when one is just casually browsing the code.
Stunts with binoculars
I was satisfied with the progress of the analysis, but the results were forcing me to reconsider how much effort the modding would require. At the beginning of the project I was hoping to radically expand the field of view by changing a couple of bytes, like I did in Stunt Island, but it was clear that this time the task would be more complex. Changing the detail threshold variable to a value greater then 2 would not make more tiles appear magically, they would keep being 23 since this is what the datatable contains. So the way to go was to extend the table, but naturally this could not be done with a simple hex-edit surgery, as changing the size of this variable implies adjusting potentially thousands of offsets in the rest of the program.
I accepted to dedicate more days to make this plan come true: this will be the subject of the next post. However, I was starting to long for some action and some concrete results, so I decided to produce a simpler mod, that would also serve as proof that my interpretation of the code mechanisms was correct.
As I said, we cannot add more tiles with just a hex editor, but what about shifting them around? One could alter the coordinates of the tiles at the right and left borders of the field of vision, and move them to the front to extend the depth at the expense of the width. The result would be the equivalent of seeing the world through binoculars – maybe not “better” than the original game, but surely something different!
I opened the game file with Bless and looked for the tile tables. Finding them was easy, as I could just check their content in the .asm file and search for the corresponding bytes in the hex editor. Changing the coordinates was conceptually easy, it just required the patience and precision of a surgeon since eight different tables needed to be edited, and even one byte too much or too few would break the executable.

unk_3BE9A. Left: original game, right: modded.See e.g. how the first tile was moved from
02 FC to 00 FB, that is from (2, -4) to (0, -5).Despite the late hour, I somehow managed to avoid fatal errors, and for the first time in Stunts’ history, the hill of the Default track could be seen without leaving the starting line!
The result was well worth of a celebration and I was happy to share this first achievement with the Stunts community, starting a forum thread dedicated to the modding project.
I took some time before I could put off the rose-tinted glasses and have an objective look at the picture. With cool mind, the glitches are evident: why is the windmill not there? And what are those grey blobs on the uphill road? But the mystery did not last long: I realized that, when changing the coordinates, I had not taken care of rearranging the tiles to keep them sorted by distance. So the game engine would draw the tile with the windmill, but then it would overdraw it with the hill (you can still make out the top of a blade, the only surviving pixels of the building). Later, it would render the farthest tile containing the blocks of the slalom road, which appeared in the middle of the ramp instead of being hidden by it.
Anyway, as a proof of concept the experiment was a success. The end goal was to add tiles and I wanted to move in that direction, so I decided not to invest more effort in polishing this first executable. However, I took the time to test a second change: forcing the engine to use high-polygon models for every object on the track. As we saw in the previous code snippet, the game chooses the low-polygon version under the condition (var_FC != 0). I could have patched away the corresponding if instruction, but I found it easier to fix the value of the variable to 0.
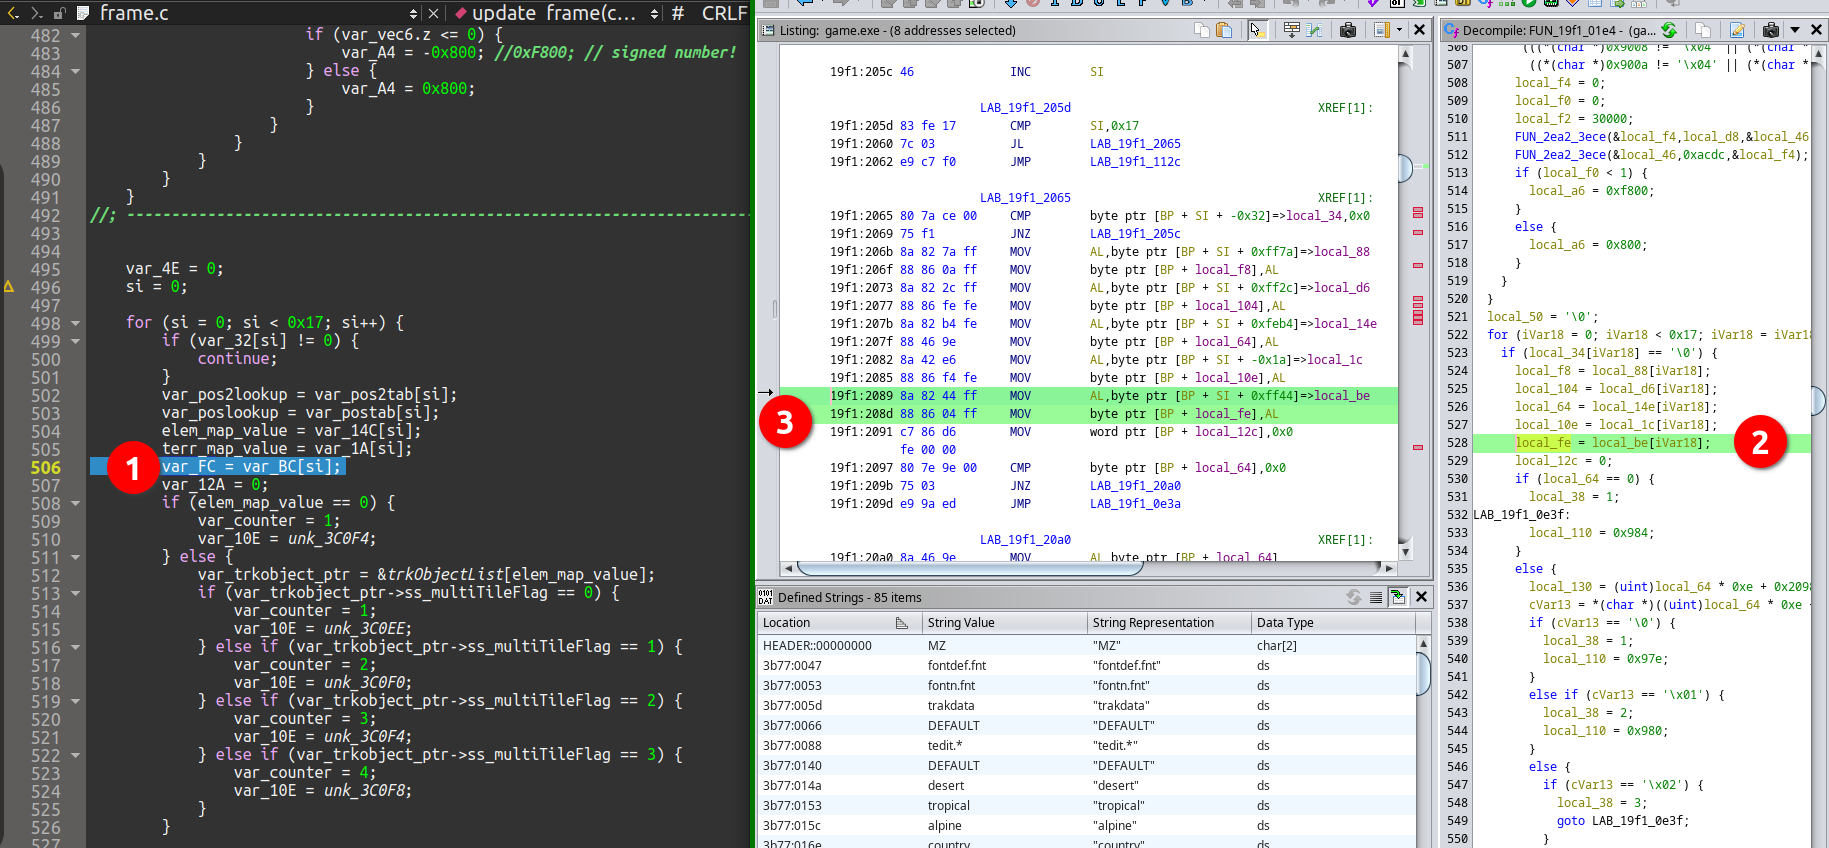
var_FC is set in the Restunts code2. Locate the equivalent line in Ghidra's “Decompile” window, and select it
3. Ghidra helpfully highlights the corresponding assembly instructions
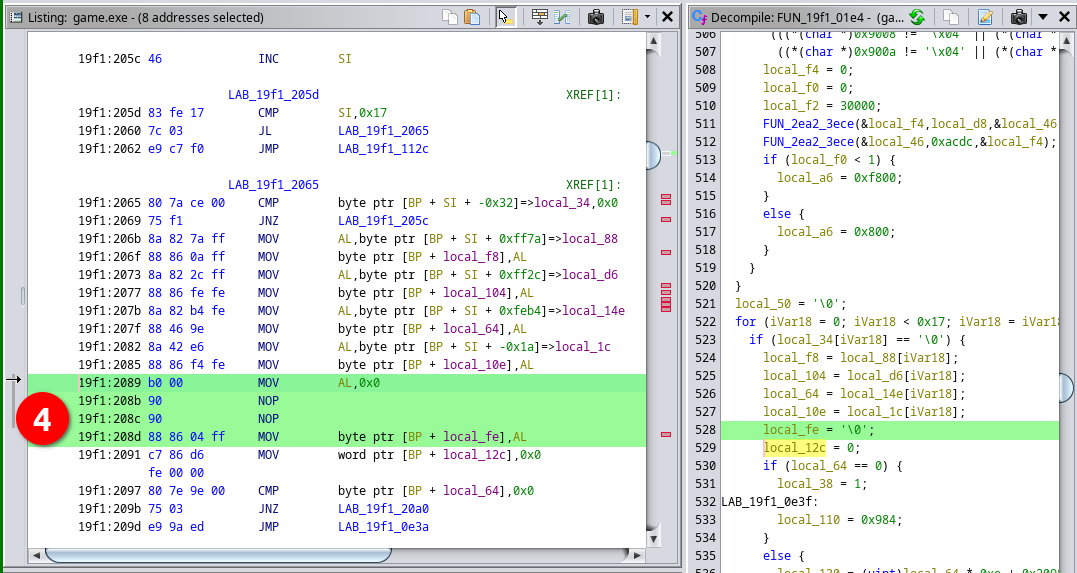
The assignment var_FC = var_BC[si] loads the detail threshold of the si-th tile. In the machine code this is split in two instructions, since x86 CPUs cannot do arbitrary memory-to-memory copies: first they need to read the data into a register (in this case, AL), then write from there into the destination address. I could have fiddled with either of the two instructions; I chose the first one and changed the code to store 0 into AL.
Ghidra can probably save the patched file, but I found it safer to just take note of the bytes to replace and alter the .EXE with a hex editor. You can check the result manually by downloading and comparing the original game and the patched copy:
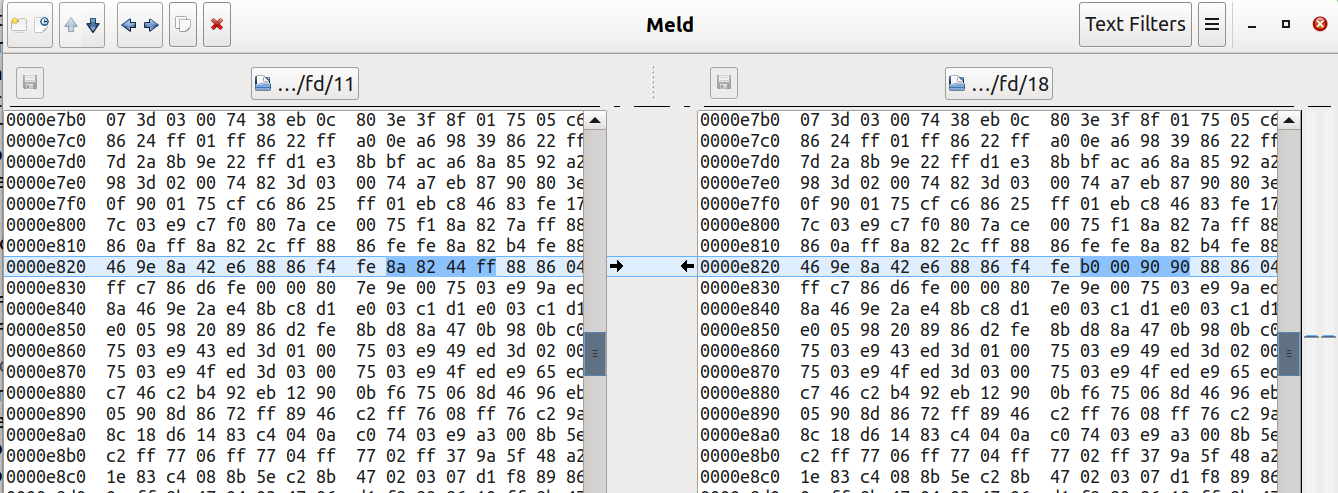
meld <( hexdump -C game.exe ) <( hexdump -C gamebino.exe ).On Windows, Beyond Compare should be a suitable utility for the task.
End of part I
After the last adjustment, I took the time to play around with the mod. The result was not what I would call “improvement”, but it had some novelty value.
Failing to sort the tiles by distance creates all sort of Z-ordering errors. The clipping issues are illustrated by the clipper (nomen omen) at 00:37, and by other track objects throughout the replay. Moreover, the extra vision distance is only effective when looking in the four cardinal directions: no extra range is obtained when the car points diagonally with respect to the North-South axis. On the other hand, the game runs without problems, and the windmill is always rendered using the high-definition model.
In overall, the prototype showed that my understanding of the rendering mechanisms was correct, which was vital for me to plan the next phase of the modding. But it was time to call it a day, and the same is true for this writeup. The story continues in part II!